I used to dabble in digital photography, even attended a series of workshops for a year. I’m still amateur level, I think, and haven’t shot much in the past 7 years or so. Still, I have a few thousand pictures, some edited and some not at all, that sit in my archives, and I’d like to edit and publish at least some of those.
Only problem: I didn’t have any photo management and development software I’m comfortable with.
I used to own Lightroom 3 and 4. I still do, but they probably don’t install on current Macs, and Adobe made it hard if not impossible to get a license for the current Lightroom Classic app without paying 20 euros per month. So I’ve been looking for alternatives.
Rounding up photo editors
Here’s a list of what I found:
- Capture One, the priciest option for pros (around €500).
- DxO PhotoLab, more affordable (€130); I’ve heard some good things.
- ON1 Photo Raw (€102), not a good option for my M1 Mac1.
- Exposure X6 (€110), which seems interesting.
- Skylum Luminar (€90 standalone, €150 with their new “AI” tools), which was slow when I tried it a few years back but might have improved since.
- Darkroom (€88, or a €22/year subscription), seems to integrate with the Apple Photos library and provide a bunch of tools in a nicely designed package 2.
- Photoscape X (€44), seems marketed for the Instagram crowd but could be powerful anyway.
- Picktorial ($5/month subscription).
- Apple’s own Photos app (included with macOS), which I tried briefly, but I don’t want to import my photos from my archive folders on external drives and into their Photos Library; I hear the development tools are a bit limited too.
I also got Affinity Photo and Pixelmator Pro, each for around €50. While they can do some RAW development, and have some great features, they’re closer to Photoshop in spirit. So not my cup of tea. They also don’t include a library browser or manager.
There are a few open-source options too, such as Darktable, RawTherapee and LightZone. I didn’t consider them because they tend to have limited macOS support3, a steep learning curve, and questionable usability4.
Finally, after reading this review of the Apple ProRAW format, I discovered a small macOS and iOS app called RAW Power. It piqued my interest since it’s cheap (around €30), runs natively on Apple’s new CPUs, and looks similar in spirit to early versions of Lightroom and Aperture.
The RAW Power UI
RAW Power is developed by Nik Bhatt, who worked for years at Apple on the Aperture team. A bunch of user comments call RAW Power a spiritual successor to Aperture, though at this time its feature set seems more limited (with a few exceptions where it’s more up-to-date).
It was originally a development extension for Apple Photos, before gaining a photo library module in version 2 (improved further in version 3), making it usable as a standalone app as well. You can get a trial version on the app’s website, which is fully functional and adds a watermark to exported photos.
Before trying it out, I took an hour to watch this video tutorial series recorded by Nik. I especially liked this one, RAW Power 3 for Mac: Rating and Filtering Workflow. That workflow is not super specific to RAW Power, and could be reproduced in several apps, but sharing this method was a nice touch.
The RAW Power UI looks like this:
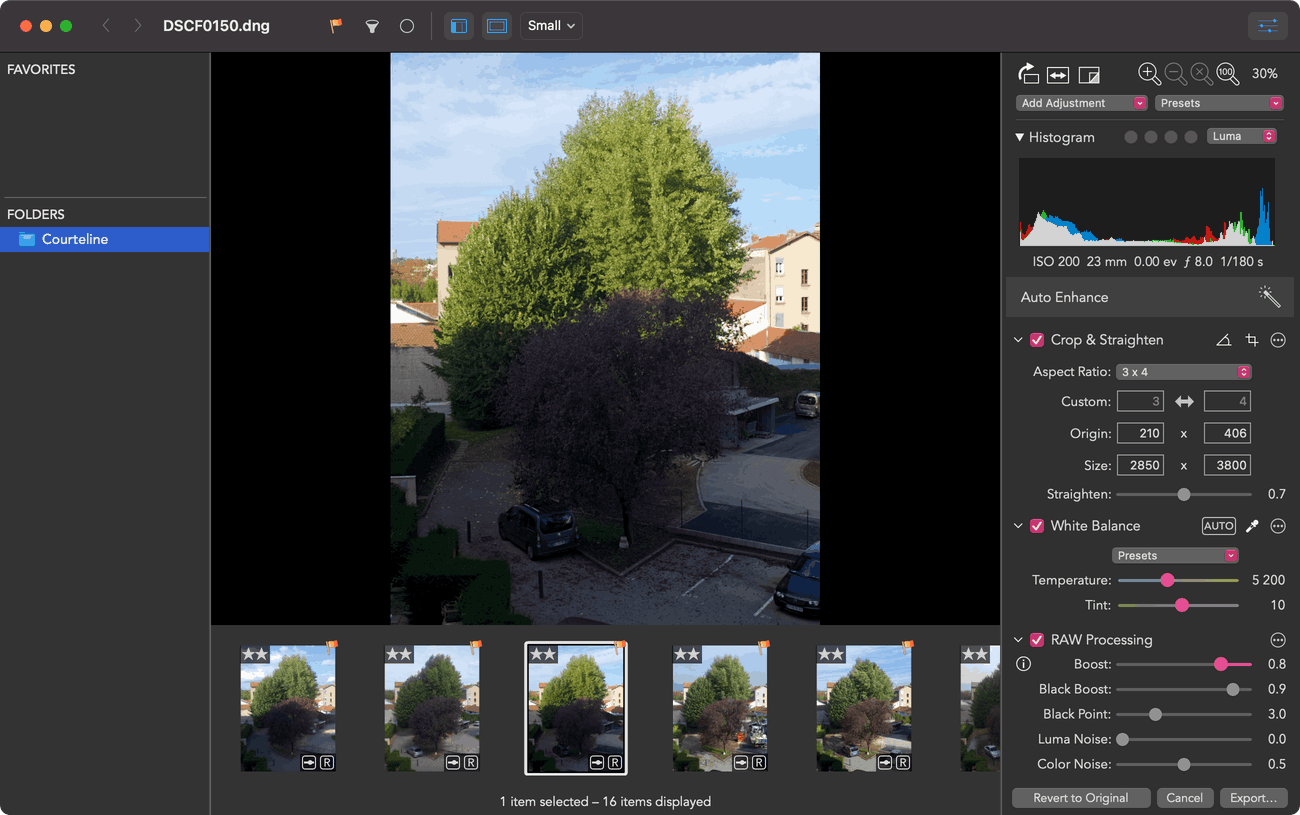
The UI can be customized a bit, and includes:
- Top: a toolbar that can be customized and rearranged
- Left: a library explorer showing folders or Apple Photos albums
- Center: the main photo view
- Bottom a tab strip
- Right: a sidebar which shows either photo metadata or RAW development tools
All those UI components can be hidden or toggled. And if you hide the main photo viewer, the thumbnail strip becomes a bigger thumbnail grid.
This lets you customize your workspace however you want, but sometimes I find that I want to go from one UI configuration to another, and clicking 3 buttons to change things one way and then 3 buttons to change it back is a bit painful.5
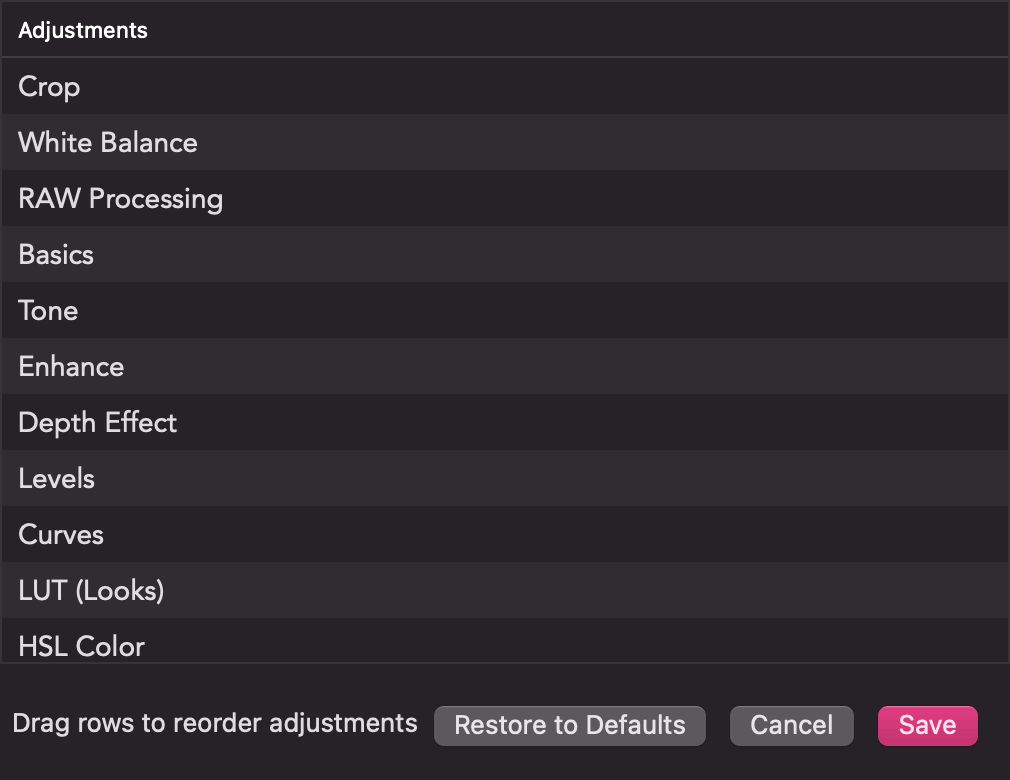
On the customizing front, you can also reorder and show or hide each of the RAW “adjustments” modules that appear in the Edit sidebar. The interface for that would benefit from some improvements though, since you need to use different menus to add a module, hide a module, and reorder modules; it would be possible to unify all that in a single, more intuitive config view.
Personally, I’m missing a way to quickly show the photo’s metadata when I’m in Edit mode6. I have to switch the sidebar from Edit to Info, which takes a good second for some reason, on top of making me lose my place. I’d also love to keep a histogram in Info mode.
The adjustment tools
The adjustment sidebar has a bunch of good tools:
- A good histogram with black/white and color clipping highlighting.
- White Balance (with a decent Auto option and manual control).
- A good Crop tool (I like being able to control the precise pixel size and coordinates, it came in handy working on a photo series where I’m trying to align 20 pictures taken from the same spot!), and a Perspective tool that is maybe less intuitive.
- Basics/Tone/Enhance has the usual suspects: exposure, brightness, highlights and shadows, clarity…
- Black & White, Channel Mixer, HSL Color.
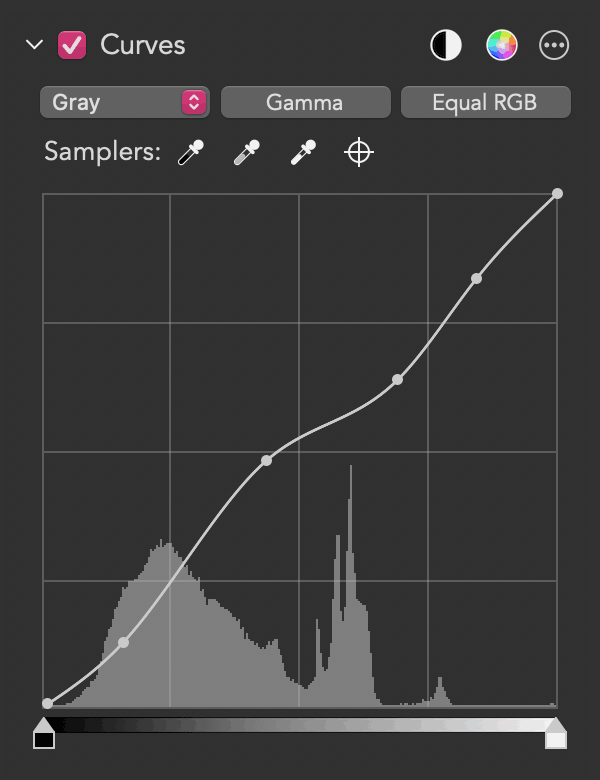
- Curves, Levels, Vignette.
- A LUT tool that lets you apply predefined styles, including some film simulation or black and white ones. I wasn’t familiar with the “LUT” term, but apparently LUTs are a kind of color map that pairs each input color to its destination color, and there are a bunch of LUTs available online from different providers, with both free and paid options.
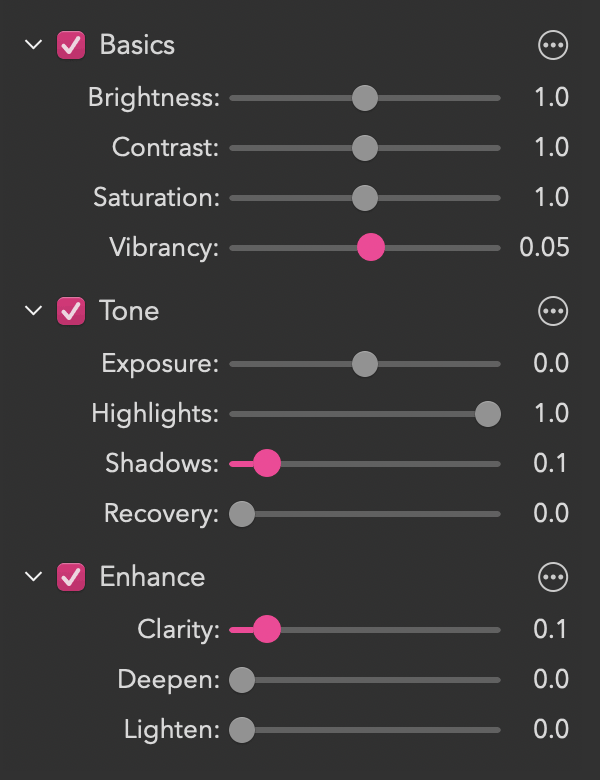
Things I like about the adjustment sliders in RAW Power:
- It’s easy to see which slider you tweaked (used the system highlight color, which is pink in my case) and which uses the default value.
- Double-click resets to the default value.
- The numbers are text inputs, and can be edited manually for precision.
Some things I don’t like:
- Some text inputs require two clicks to get focus. (Nik reached out by email and confirmed that it’s a know issue with a UI component he’s using in the app.)
- Some text inputs support the Up and Down keys to increment or decrement the value, and others don’t, depending on the module.
- Based on system settings, it decided I want a comma as the decimal separator, and wouldn’t accept input like
1.5(resetting to the default value instead). I worked around it by changing my system settings, but being more forgiving and handing both dots and commas as decimal separators would be better. - The way out of bounds values are handled (if I input
5and the maximum is2.0, please use2.0instead of discarding my input). - Slider values are single digit numbers plus two decimals, e.g.
1.00or-2.54. Most of them go from0.00to1.00, and would be easier to work with if they were shown as integers between0and100(same precision, but you don’t have to type a decimal separator all the time).
Arguably, I’m finicky. That’s the problem when you use and review software as a UI developer & designer. 😛
Overall I like the tools, they’re rather powerful. There are a few useful presets you can apply, and a couple “Auto Enhance” features which look decent but not quite magical.
One tool which is both powerful and a bit confusing is the RAW Processing adjustment. It shows 9 sliders and a couple options:

The noise controls are part of this first RAW processing pass. I haven’t worked with very noisy images yet, so I’m not sure if they’re good. The Color Noise correction seems to work well.
The “Boost” feature is interesting. It’s set at its maximum by default. If you move it back to 0%, you get a much more washed-out, lifeless picture, like you get in some RAW processing software out of the box (especially in some of the open-source ones, when they’re not set up to apply some default enhancements). Comparing the results at 0%, 50% and 100% Boost, I tend to like what it does.
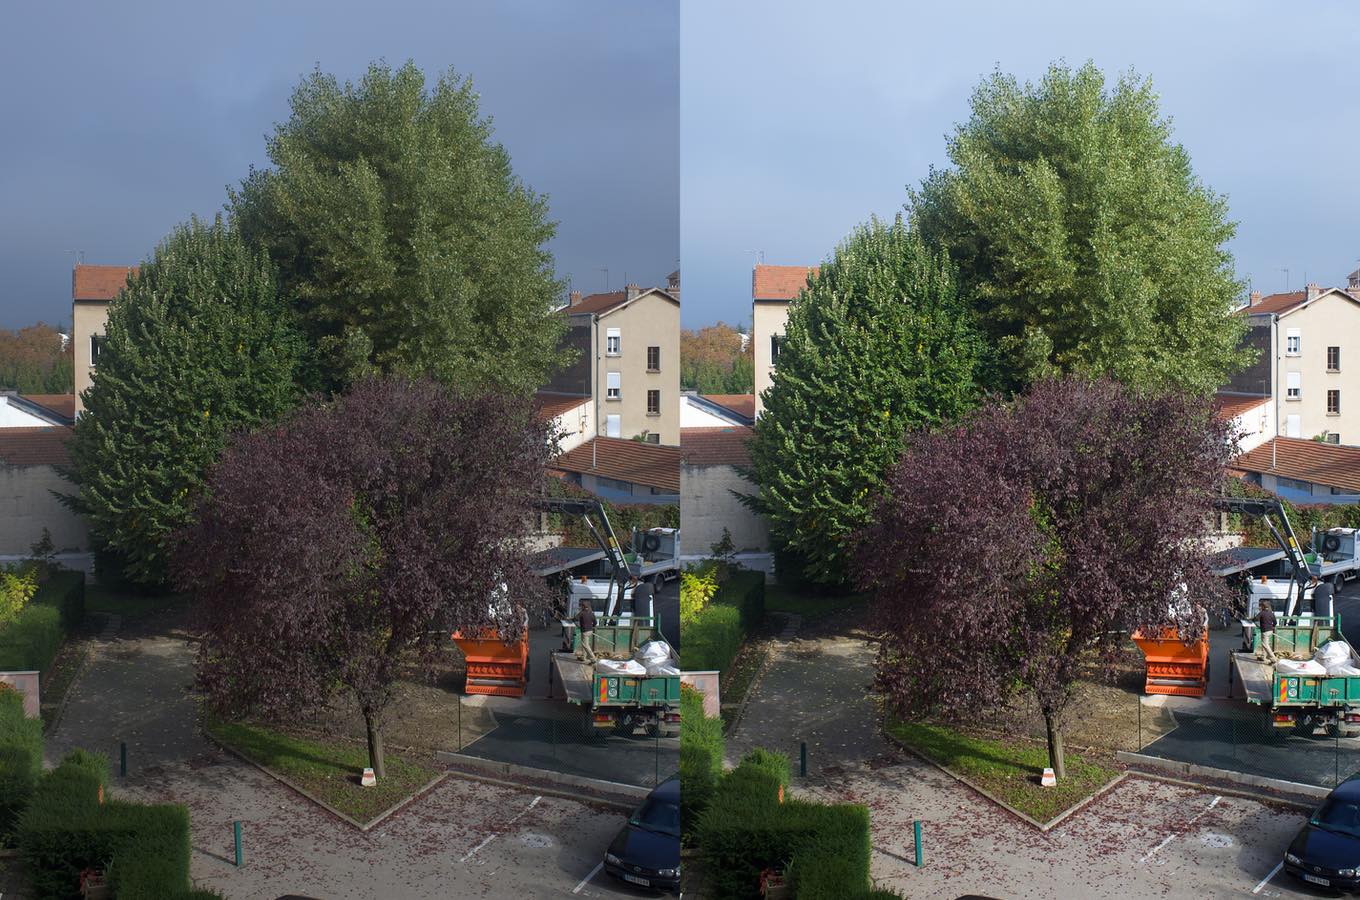
In the video tutorials, Nik shows how sometimes Boost goes a bit too far, and it’s better to lower it a bit or completely before applying other adjustments (such as highlight recovery). I’ve sometimes moved it down to 90% or 80%, but rarely all the way down.
Another slider I’ve used at times is Black Point, which er makes more or fewer parts of the image black or dark?
Sometimes it looks like there are a few ways to do the same thing, especially when it comes to contrast with: Boost, RAW Contrast, Contrast, Curves and Levels, to name a few. Or micro-contrast with RAW Sharpen, Clarity and Sharpen. It probably takes some time and expertise to learn what works best for you and your images.
I just discovered the RAW Power user manual (50 page PDF), which has more details on how adjustments work. Maybe that’ll clarify what the best approach is for some use cases.
Finally, there are no local adjustment tool: no brushes, no gradients, no repair, etc. While things like machine-learning based local repairs can be done by other software working on an exported TIFF file, it would be great to at least have support for gradient filters, e.g. to handle sky-vs-land exposure.
RAW Power 3.2 added support for Apple’s ProRAW (part of the DNG 1.6 format), which includes precomputed local adjustments from the iPhone’s software as a kind of mask or extra layer (I’m not sure) that you can turn on or off or apply partially. Maybe some of the work done on ProRAW support lays the groundwork for local adjustments? One can dream. 😄
Data portability
In an ideal world, adjustments made to a RAW photo in one app would be understood by another app. Sadly we don’t leave in this world, because RAW development and image correction algorithms are specific to each app, and there’s no standard even for common things such as exposure correction, black and white or color processing, curves, vignette, embedded LUTs, etc.
So development settings done in Lightroom, RAW Power or DxO PhotoLab won’t be interoperable at all. Okay. But can we at least make sure that those development settings are saved reliably?
Lightroom lets you write development settings as “sidecar files”, which use the .xmp extension, or embedded inside DNG files. This comes in handy when syncing files via Dropbox, saving photos on an external drive, or changing computers or operating system.
RAW Power saves development data in Documents/RAW Power, with no option to use sidecar files. This folder may look like this:

If you move or rename a photo, you risk losing the link with this development data, as stated in the help pages:
RAW Power stores its editing and rating / flag information in files stored within its “sandbox”, which is a directory inside your home folder on your disk. RAW Power stores information in the sandbox that lets it connect its data with your original images. Part of the identifier is the file name of your image, and part is the identifier generated by macOS. As a result of this system, RAW Power can connect editing and rating information to your original even if you move the file elsewhere on your disk. However, if you rename it, or move it to another volume, the link is broken.
So if you store photos on a drive, that drive dies and you later get a backup of your photos: sorry, your development data will be lost or not linked to the photos.
Update, Nik Bhatt reached out by email to give more information about this:
While the link can be broken if you move a file to another volume (or restore from a backup), there are two features in the app for reconnecting the edits to the originals. One is called Reconnect and the other is Restore Edits.
I haven’t tried those features yet, but they look like they could handle reconnecting edits to files restored from a backup.
I’d still like to have a way to rename files without losing metadata or having to reconnect metadata to the renamed files. Whether that’s by having sidecar files witch matching filenames alongside the source files, or by having more options for renaming files within Raw Power — or ideally, both.
Nik says he wants to improve file management in future releases, so I’ll keep my eyes on that.
My recommendation
Despite a few pain points and concerns, I find that RAW Power is a capable tool and I’ll probably use it more in the future, while keeping an eye on the pricier competition.
If you liked Lightroom Classic or Aperture, RAW Power might be a good fit for you, provided you can forgive a few issues and missing features.
RAW Power is, as far as I can tell, indie software with a team of one and a low price. It should give you a lot of value for your money.
I heartily recommend giving it a try.
-
I bought a ON1 Photo Raw 2020 license in a sale last year. It fails to install on my computer. The 2021 version — a somewhat pricy upgrade — is an Intel app that runs too slowly to be comfortable. I might reconsider later if the price and performance are right. ↩
-
Subjectively and just based on screenshots, Darkroom has the most attractive design. ↩
-
Darktable tells you “Good Luck :)” if you want to install a macOS version. ↩
-
That’s not a condemnation of those projects. I understand that open-source side projects made by developers might focus on Linux support and/or powerful features that scratch one’s itch over the years-long design process needed for best-in-class usability. ↩
-
For browsing and rating I might show the left sidebar, a thumbnail grid with medium thumbnails, and the metadata sidebar. For editing a particular photo, I’d hide the left sidebar, show the main photo view, and either hide the thumbnails or keep them at the smallest size. If I count the clicks needed to go from the first configuration to the other one: that’s 4 clicks. ↩
-
For instance, I’ve wanted to check data such as the shooting date and hour when tweaking white balance, to make sure the white balance is consistent with the hour and season when I’m going for a realistic look. ↩